> ## Documentation Index
> Fetch the complete documentation index at: https://docs.reown.com/llms.txt
> Use this file to discover all available pages before exploring further.
# How to Configure AppKit with Virtual TestNets?
> Learn how to use Reown AppKit to enable wallet connections and interact with Tenderly Virtual Testnets.
Learn how to use Reown AppKit to enable wallet connections and interact with [Tenderly](https://tenderly.co/) Virtual Testnets. With AppKit, you can provide seamless wallet connections, including email and social logins, on-ramp functionality, smart accounts, one-click authentication, and wallet notifications, all designed to deliver an exceptional user experience. With Tenderly's Virtual TestNets, you can replicate real networks for various stages of your Web3 app development.
## Setup
This guide assumes you have already installed and configured Reown AppKit. If you haven't please follow the [installation guide](/appkit/overview).
For this tutorial, we'll be using Next.js, though you can use any other framework compatible with AppKit.
### Create a Virtual TestNet using Tenderly
Navigate to [Tenderly Dashboard](https://dashboard.tenderly.co/explorer) and login. If you don't have an account already, then please sign up.
Now, navigate to "**Virtual TestNets**" on the dashboard.
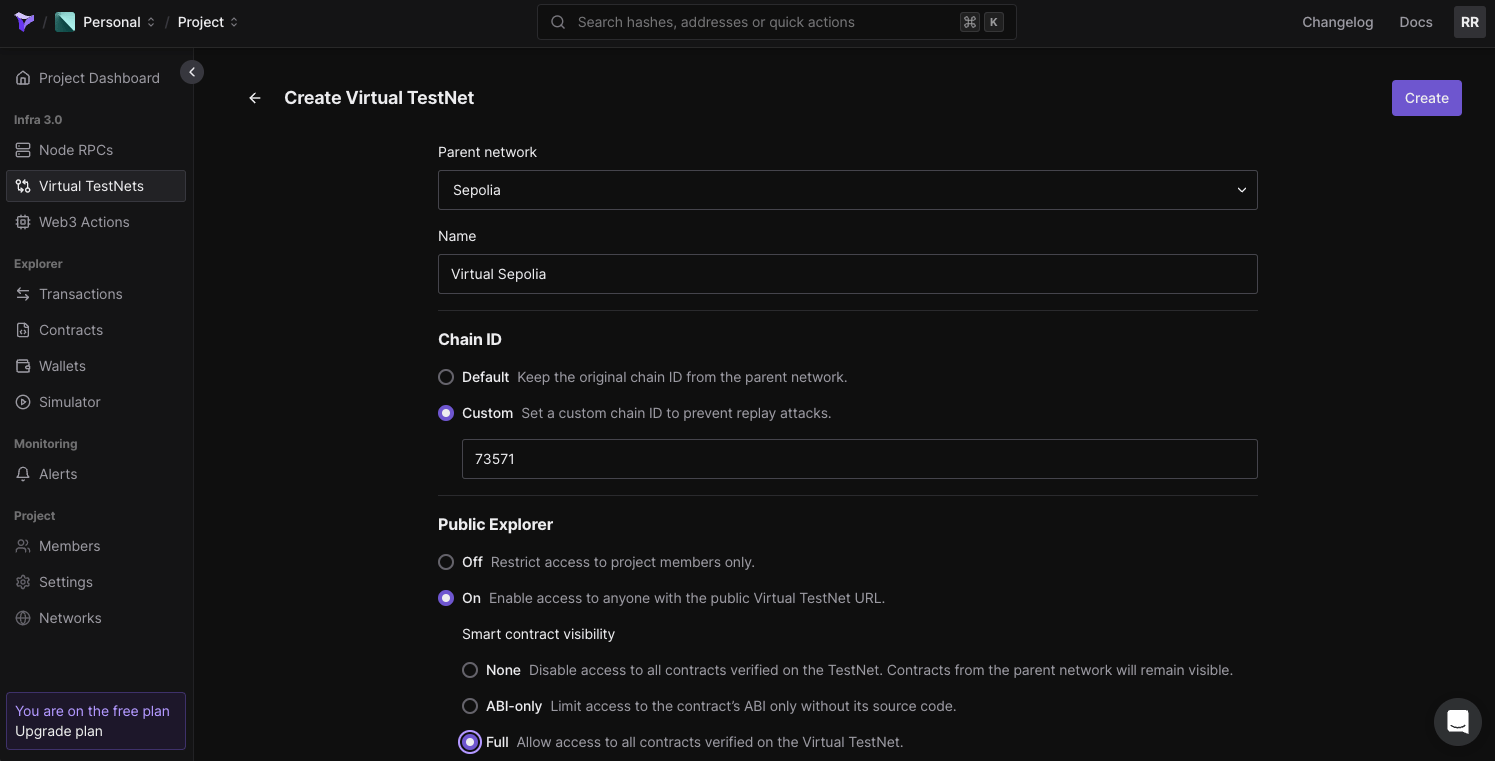
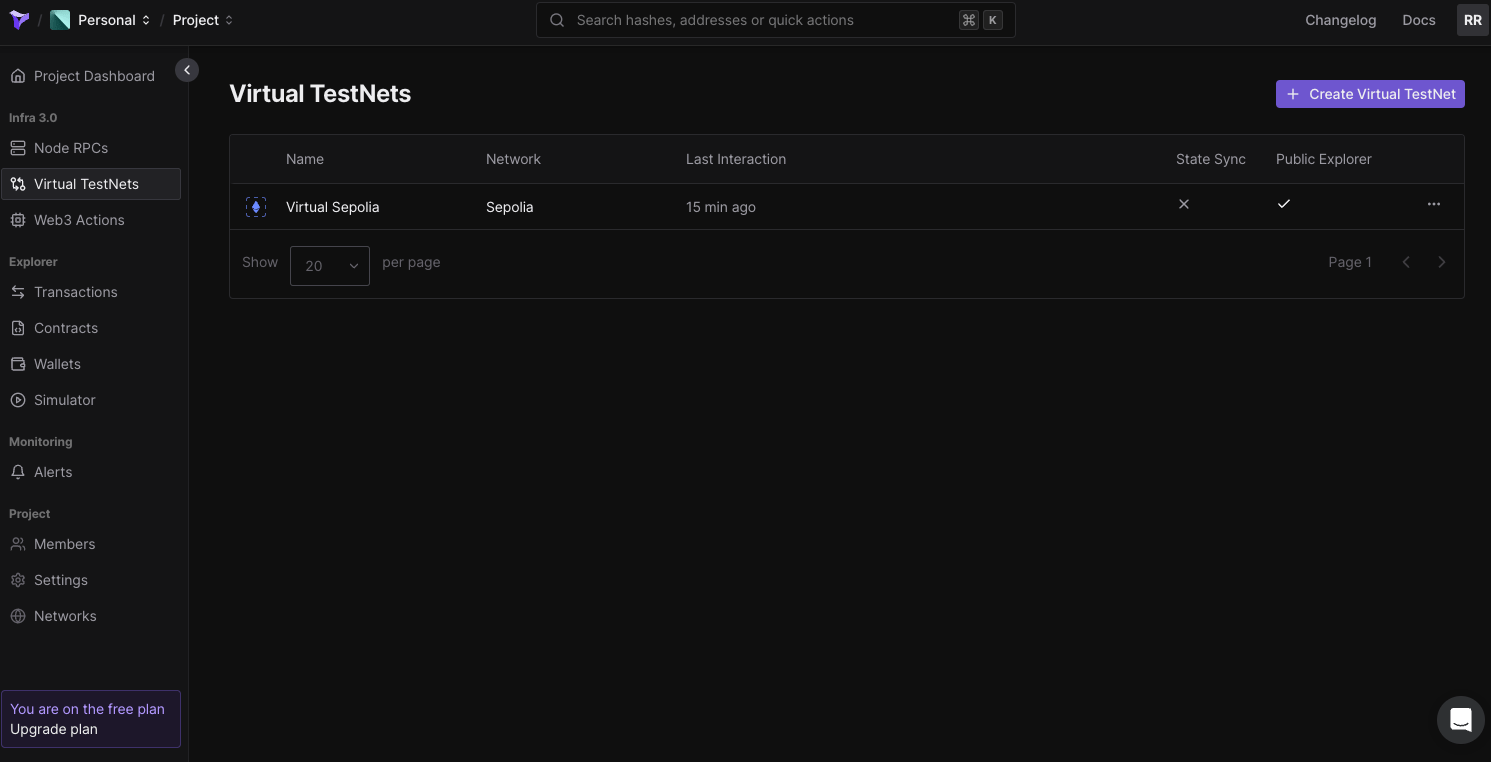 Click on **"Create Virtual TestNet."** Next, you'll be prompted to select the parent network. For simplicity, select **"Sepolia"** as the parent network, though you can choose any network you prefer.
Now, enter a name for your Virtual TestNet. Under **"Chain ID,"** select **"Custom"** and enter a unique chain ID, like **"73571,"** to avoid conflicts with the existing Sepolia chain. Set **"Public Explorer"** to **"On"** and **"Smart Contract Visibility"** to **"Full."**
Click on **"Create Virtual TestNet."** Next, you'll be prompted to select the parent network. For simplicity, select **"Sepolia"** as the parent network, though you can choose any network you prefer.
Now, enter a name for your Virtual TestNet. Under **"Chain ID,"** select **"Custom"** and enter a unique chain ID, like **"73571,"** to avoid conflicts with the existing Sepolia chain. Set **"Public Explorer"** to **"On"** and **"Smart Contract Visibility"** to **"Full."**
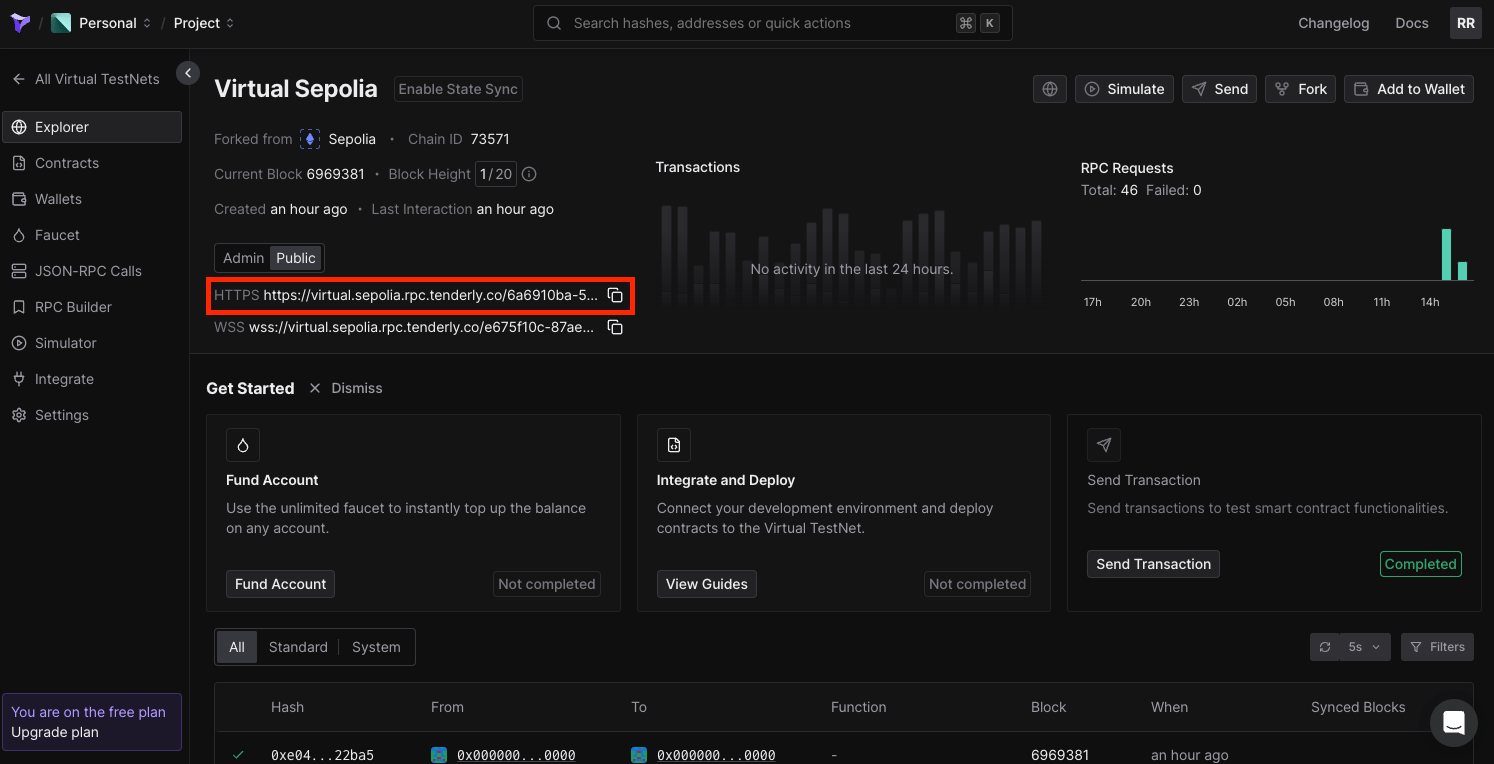
 Now, click on **"Create"** to set up the Virtual TestNet. You will see that your Virtual TestNet has been created, and you can find the RPC and other relevant information for it. Please copy the `HTTPS` URL under "**Public**" as this will be your Virtual TestNet's RPC URL.
 ## Build the App
Before we build the app, let's first configure our `.env` file. On the root level of your code directory, create a new file named `.env`.
Open that file and create a new variable `NEXT_PUBLIC_PROJECT_ID`. You will assign the project Id that you copied in the previous step to this environment variable that you just created. You need to do the same for `TENDERLY_VIRTUAL_TESTNET_RPC`. This is what it will look like:
```jsx title=".env" theme={null}
NEXT_PUBLIC_PROJECT_ID =
TENDERLY_VIRTUAL_TESTNET_RPC =
```
Please make sure you follow best practices when working with secret keys and other sensitive information. Environment variables that start with `NEXT_PUBLIC` will be exposed by your app, which can be misused by bad actors.
### Configure Tenderly Virtual TestNet with AppKit
In order to set up Tenderly's Virtual TestNet with AppKit, you need to first configure your Tenderly Virtual TestNet as a custom chain.
Inside your `/app` directory, create a new file named `tenderly.config.ts`. Now, paste the code snippet shared below inside the code file, i.e., `app/tenderly.config.ts`.
```tsx title="app/tenderly.config.ts" theme={null}
import { defineChain } from "@reown/appkit/networks";
export const vTestnet = defineChain({
id: 73571, // Add this to match the chain Id you set for your Virtual TestNet
caipNetworkId: "eip155:73571",
chainNamespace: "eip155",
name: "Virtual Sepolia",
nativeCurrency: { name: "vSepolia", symbol: "vETH", decimals: 18 },
rpcUrls: {
default: {
http: [process.env.TENDERLY_VIRTUAL_TESTNET_RPC!],
},
},
blockExplorers: {
default: {
name: "Tenderly Explorer",
url: "https://dashboard.tenderly.co/explorer/vnet/6a6910ba-5831-4758-9d89-1f8e3169433f", // replace with your Virtual TestNet's explorer URL
},
},
contracts: {
ensRegistry: {
address: "0x00000000000C2E074eC69A0dFb2997BA6C7d2e1e",
},
ensUniversalResolver: {
address: "0xE4Acdd618deED4e6d2f03b9bf62dc6118FC9A4da",
blockCreated: 16773775,
},
multicall3: {
address: "0xca11bde05977b3631167028862be2a173976ca11",
blockCreated: 14353601,
},
},
});
```
1. `id` — set this to the chain Id that you passed while creating the Virtual TestNet on Tenderly.
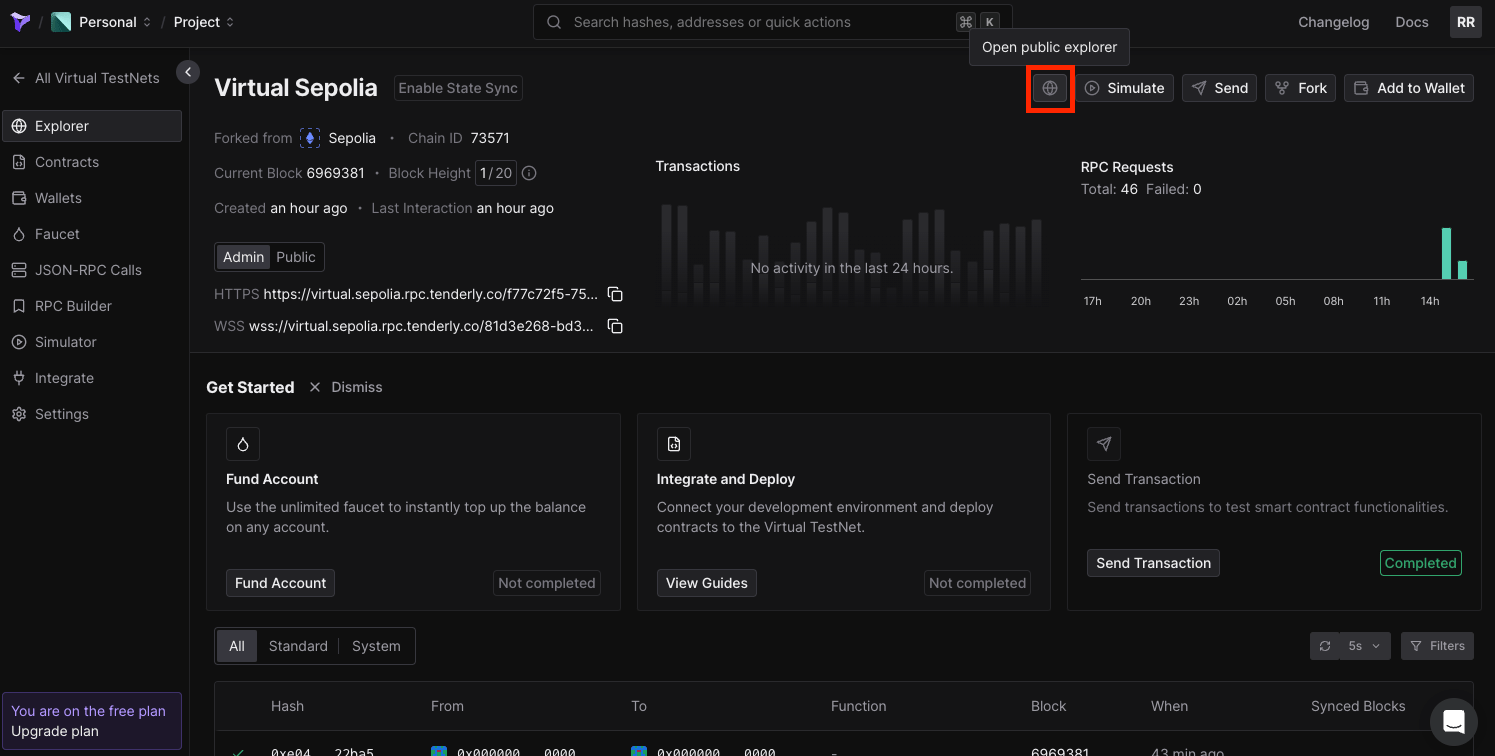
2. `url` — set this with your Virtual TestNet's explorer URL. You can find this URL within your Virtual TestNet's configuration on Tenderly Dashboard.
## Build the App
Before we build the app, let's first configure our `.env` file. On the root level of your code directory, create a new file named `.env`.
Open that file and create a new variable `NEXT_PUBLIC_PROJECT_ID`. You will assign the project Id that you copied in the previous step to this environment variable that you just created. You need to do the same for `TENDERLY_VIRTUAL_TESTNET_RPC`. This is what it will look like:
```jsx title=".env" theme={null}
NEXT_PUBLIC_PROJECT_ID =
TENDERLY_VIRTUAL_TESTNET_RPC =
```
Please make sure you follow best practices when working with secret keys and other sensitive information. Environment variables that start with `NEXT_PUBLIC` will be exposed by your app, which can be misused by bad actors.
### Configure Tenderly Virtual TestNet with AppKit
In order to set up Tenderly's Virtual TestNet with AppKit, you need to first configure your Tenderly Virtual TestNet as a custom chain.
Inside your `/app` directory, create a new file named `tenderly.config.ts`. Now, paste the code snippet shared below inside the code file, i.e., `app/tenderly.config.ts`.
```tsx title="app/tenderly.config.ts" theme={null}
import { defineChain } from "@reown/appkit/networks";
export const vTestnet = defineChain({
id: 73571, // Add this to match the chain Id you set for your Virtual TestNet
caipNetworkId: "eip155:73571",
chainNamespace: "eip155",
name: "Virtual Sepolia",
nativeCurrency: { name: "vSepolia", symbol: "vETH", decimals: 18 },
rpcUrls: {
default: {
http: [process.env.TENDERLY_VIRTUAL_TESTNET_RPC!],
},
},
blockExplorers: {
default: {
name: "Tenderly Explorer",
url: "https://dashboard.tenderly.co/explorer/vnet/6a6910ba-5831-4758-9d89-1f8e3169433f", // replace with your Virtual TestNet's explorer URL
},
},
contracts: {
ensRegistry: {
address: "0x00000000000C2E074eC69A0dFb2997BA6C7d2e1e",
},
ensUniversalResolver: {
address: "0xE4Acdd618deED4e6d2f03b9bf62dc6118FC9A4da",
blockCreated: 16773775,
},
multicall3: {
address: "0xca11bde05977b3631167028862be2a173976ca11",
blockCreated: 14353601,
},
},
});
```
1. `id` — set this to the chain Id that you passed while creating the Virtual TestNet on Tenderly.
2. `url` — set this with your Virtual TestNet's explorer URL. You can find this URL within your Virtual TestNet's configuration on Tenderly Dashboard.
 Now, in your `config/index.tsx` file, import `vTestnet` from `app/tenderly.config.ts`. You'll also need to configure transports within the `WagmiAdapter` function. Refer to the code snippet below.
```tsx title="config/index.tsx" theme={null}
import { cookieStorage, createStorage, http } from "@wagmi/core";
import { WagmiAdapter } from "@reown/appkit-adapter-wagmi";
import { mainnet, arbitrum } from "@reown/appkit/networks";
import { vTestnet } from "@/app/tenderly.config";
// Get projectId from https://dashboard.reown.com
export const projectId = process.env.NEXT_PUBLIC_PROJECT_ID;
if (!projectId) {
throw new Error("Project ID is not defined");
}
export const networks = [mainnet, arbitrum, vTestnet];
// Set up the Wagmi Adapter (Config)
export const wagmiAdapter = new WagmiAdapter({
storage: createStorage({
storage: cookieStorage,
}),
ssr: true,
transports: {
[vTestnet.id]: http(process.env.TENDERLY_VIRTUAL_TESTNET_RPC!),
},
networks,
projectId,
});
export const config = wagmiAdapter.wagmiConfig;
```
Now, inside your `context/index.tsx` file, you also need to import `vTestnet` and pass it as one of the supported networks within the `createAppKit` function, as shown below.
```tsx title="context/index.tsx" theme={null}
"use client";
import { wagmiAdapter, projectId } from "@/config";
import { createAppKit } from "@reown/appkit/react";
import { mainnet, arbitrum } from "@reown/appkit/networks";
import { vTestnet } from "@/app/tenderly.config";
import { QueryClient, QueryClientProvider } from "@tanstack/react-query";
import React, { type ReactNode } from "react";
import { cookieToInitialState, WagmiProvider, type Config } from "wagmi";
// Set up queryClient
const queryClient = new QueryClient();
if (!projectId) {
throw new Error("Project ID is not defined");
}
// Set up metadata
const metadata = {
name: "appkit-example",
description: "AppKit Example - EVM",
url: "https://exampleapp.com", // origin must match your domain & subdomain
icons: ["https://avatars.githubusercontent.com/u/37784886"],
};
// Create the modal
const modal = createAppKit({
adapters: [wagmiAdapter],
projectId,
networks: [mainnet, arbitrum, vTestnet],
metadata: metadata,
features: {
analytics: true, // Optional - defaults to your Cloud configuration
},
});
function ContextProvider({
children,
cookies,
}: {
children: ReactNode;
cookies: string | null;
}) {
const initialState = cookieToInitialState(
wagmiAdapter.wagmiConfig as Config,
cookies
);
return (
{children}
);
}
export default ContextProvider;
```
You can now run the app and test it out. In order to do so, run the command given below.
```bash theme={null}
npm run dev
```
> If you are using alternative package managers, you can try either of these commands — `yarn dev`, `pnpm dev`, or `bun dev`.
## Conclusion
And that's it! You have now learned how to create a simple app using AppKit and configure it with [Tenderly](https://tenderly.co/) Virtual TestNets.
View the complete code repository here.
Now, in your `config/index.tsx` file, import `vTestnet` from `app/tenderly.config.ts`. You'll also need to configure transports within the `WagmiAdapter` function. Refer to the code snippet below.
```tsx title="config/index.tsx" theme={null}
import { cookieStorage, createStorage, http } from "@wagmi/core";
import { WagmiAdapter } from "@reown/appkit-adapter-wagmi";
import { mainnet, arbitrum } from "@reown/appkit/networks";
import { vTestnet } from "@/app/tenderly.config";
// Get projectId from https://dashboard.reown.com
export const projectId = process.env.NEXT_PUBLIC_PROJECT_ID;
if (!projectId) {
throw new Error("Project ID is not defined");
}
export const networks = [mainnet, arbitrum, vTestnet];
// Set up the Wagmi Adapter (Config)
export const wagmiAdapter = new WagmiAdapter({
storage: createStorage({
storage: cookieStorage,
}),
ssr: true,
transports: {
[vTestnet.id]: http(process.env.TENDERLY_VIRTUAL_TESTNET_RPC!),
},
networks,
projectId,
});
export const config = wagmiAdapter.wagmiConfig;
```
Now, inside your `context/index.tsx` file, you also need to import `vTestnet` and pass it as one of the supported networks within the `createAppKit` function, as shown below.
```tsx title="context/index.tsx" theme={null}
"use client";
import { wagmiAdapter, projectId } from "@/config";
import { createAppKit } from "@reown/appkit/react";
import { mainnet, arbitrum } from "@reown/appkit/networks";
import { vTestnet } from "@/app/tenderly.config";
import { QueryClient, QueryClientProvider } from "@tanstack/react-query";
import React, { type ReactNode } from "react";
import { cookieToInitialState, WagmiProvider, type Config } from "wagmi";
// Set up queryClient
const queryClient = new QueryClient();
if (!projectId) {
throw new Error("Project ID is not defined");
}
// Set up metadata
const metadata = {
name: "appkit-example",
description: "AppKit Example - EVM",
url: "https://exampleapp.com", // origin must match your domain & subdomain
icons: ["https://avatars.githubusercontent.com/u/37784886"],
};
// Create the modal
const modal = createAppKit({
adapters: [wagmiAdapter],
projectId,
networks: [mainnet, arbitrum, vTestnet],
metadata: metadata,
features: {
analytics: true, // Optional - defaults to your Cloud configuration
},
});
function ContextProvider({
children,
cookies,
}: {
children: ReactNode;
cookies: string | null;
}) {
const initialState = cookieToInitialState(
wagmiAdapter.wagmiConfig as Config,
cookies
);
return (
{children}
);
}
export default ContextProvider;
```
You can now run the app and test it out. In order to do so, run the command given below.
```bash theme={null}
npm run dev
```
> If you are using alternative package managers, you can try either of these commands — `yarn dev`, `pnpm dev`, or `bun dev`.
## Conclusion
And that's it! You have now learned how to create a simple app using AppKit and configure it with [Tenderly](https://tenderly.co/) Virtual TestNets.
View the complete code repository here.